Introduction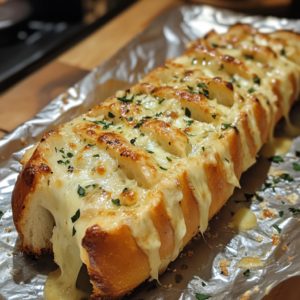
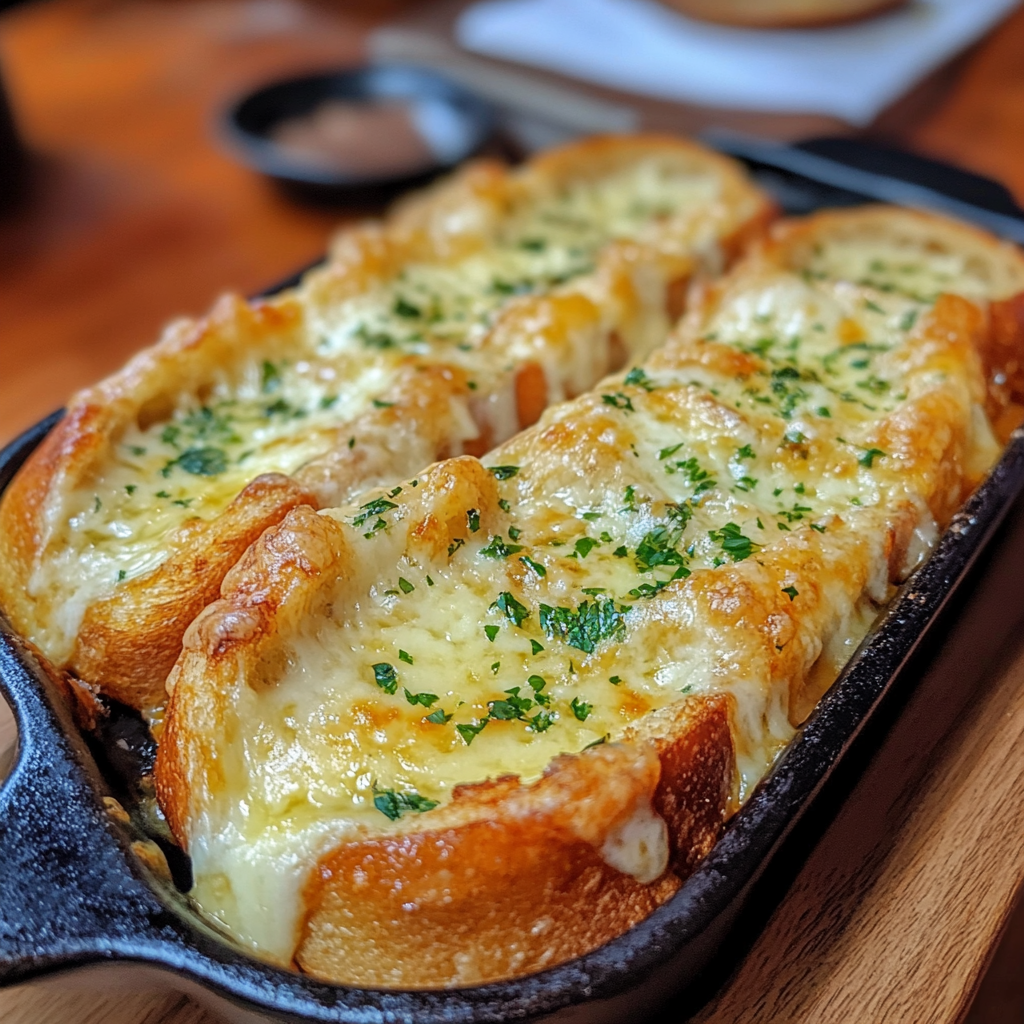
Cheesy garlic bread is a beloved dish that captures the essence of comfort food in every bite. Whether you’re enjoying it as a side with pasta or simply indulging in it as a snack, its rich flavors and gooey texture never fail to please. The combination of fresh garlic and melting cheese on warm, crusty bread creates an irresistible aroma that fills your kitchen and entices everyone nearby. This recipe ensures that you can whip up this delectable treat right at home with minimal effort.
In addition to being incredibly delicious, cheesy garlic bread is also versatile. You can serve it alongside your favorite Italian dishes or make it the star of your appetizer spread at gatherings. It’s perfect for parties, movie nights, or even just a cozy evening in. Plus, making it from scratch allows you to customize the ingredients to suit your taste preferences.
Follow along as we guide you through the ingredients and step-by-step instructions to create this cheesy delight. Your family and friends will rave about your homemade version of cheesy garlic bread; they won’t believe how easy it is to prepare! Get ready to enjoy the simple yet satisfying experience of making this classic dish.
Ingredients
Bread (1 loaf)
The foundation of any great cheesy garlic bread starts with the right type of bread. A crusty French baguette or ciabatta works beautifully due to their sturdy texture and ability to hold up against toppings. For a softer option, consider using Italian bread or even sourdough. Aim for a loaf that is fresh but not overly soft; this ensures it won’t become soggy during baking.
Butter (1/2 cup)
Butter adds richness and flavor to your cheesy garlic bread. Use unsalted butter for more control over the saltiness of your dish. Allow the butter to soften at room temperature so it’s easy to spread evenly over the bread slices. You can also use a mix of butter and olive oil for added flavor and health benefits.
Garlic (4 cloves)
Fresh garlic is crucial for that signature garlicky flavor in cheesy garlic bread. Mince four cloves finely to release their oils and ensure an even distribution across your dish. If you’re a fan of intense garlic flavor, feel free to add more cloves according to your preference.
Cheese (1 cup shredded mozzarella)
Mozzarella cheese provides the gooey texture that makes cheesy garlic bread so irresistible. Shred your own mozzarella if possible; pre-shredded varieties often contain anti-caking agents that can affect meltability. For extra flavor, consider mixing in some grated Parmesan cheese or using cheddar for a sharper taste.
Parsley (2 tablespoons chopped)
Chopped fresh parsley adds a pop of color and freshness to your cheesy garlic bread. It balances out the richness from the butter and cheese while enhancing presentation. Feel free to substitute with other herbs like basil or oregano if desired.
How to Prepare Cheesy Garlic Bread
Step 1: Preheat Your Oven
Begin by preheating your oven to 400°F (200°C). This temperature is optimal for achieving perfectly toasted edges while ensuring the cheese melts beautifully without burning. While your oven heats up, you can prepare the other components of your cheesy garlic bread.
Step 2: Prepare the Garlic Butter Mixture
In a mixing bowl, combine softened butter with minced garlic and chopped parsley; mix thoroughly until well incorporated. The goal is to distribute the flavors uniformly throughout the butter so every bite will be rich in taste! If you want an extra kick, consider adding a pinch of red pepper flakes or Italian seasoning into this mix.
Step 3: Slice Your Bread
Take your chosen loaf of bread and slice it down the middle lengthwise using a serrated knife. If you prefer smaller pieces for sharing or snacking, cut each half into smaller sections after slicing them open. This method helps achieve crispy edges while keeping the inside soft and inviting.
Step 4: Spread the Garlic Butter Mixture
Using a spatula or knife, generously spread your prepared garlic butter mixture evenly across both halves of the sliced loaf—don’t skimp on coverage! Make sure every inch gets coated so that each bite bursts with flavor when baked.
Step 5: Add Cheese
After applying the butter mixture, sprinkle shredded mozzarella evenly over each half of the loaf—ensure no area is left bare! For an indulgent twist on traditional recipes, feel free to layer additional cheese varieties like cheddar or Parmesan atop mozzarella for complexity in flavor.
Step 6: Bake Your Cheesy Garlic Bread
Place both halves on an aluminum foil-lined baking sheet cut side up; this makes cleanup easier afterward! Bake in preheated oven for approximately 10-15 minutes until golden brown edges form around melted cheese bubbles—monitor closely!
Step 7: Broil for Extra Crispiness (Optional)
If desired, switch on the broiler setting during last couple minutes of baking time—this achieves an irresistible crispy top layer! Keep an eye on it as broiling can go from perfectly toasted to burnt quickly due its high heat intensity.
Step 8: Cool Slightly Before Serving
Once finished baking (or broiling), remove from oven carefully—allowing cool slightly before slicing again if needed! This step prevents scalding yourself upon biting into hot melted cheese while giving time for flavors settle together nicely!
Serving and Storing Tips
Serving Suggestions
Cheesy garlic bread pairs wonderfully with various meals—it serves as an excellent accompaniment alongside pasta dishes like spaghetti marinara or fettuccine Alfredo! For lighter fare options consider serving alongside salads such as Caesar salad which balances richness nicely thanks tangy dressing flavors found therein!
Feel free also serve alone during gatherings where finger foods abound; cut into smaller pieces making them ideal snacks while mingling amongst guests! Don’t forget garnishing freshly chopped parsley atop before serving enhances visual appeal greatly too!
Storage Guidelines
To store leftover cheesy garlic bread properly let cool completely first then wrap tightly in plastic wrap or place inside airtight container—this prevents drying out quickly when stored away! Store in refrigerator where they’ll last up three days max without losing quality significantly—but best enjoyed sooner rather than later!
If wishing preserve longer periods freeze wrapped leftovers first then place within freezer-safe bags avoiding excess air trapped inside preventing freezer burn effects impacting flavors negatively later upon reheating process down road!
When ready enjoy again simply reheat oven set low temperature around 350°F allowing warm through without overcooking resulting crunchy texture lost otherwise during reheating!
—
With these detailed instructions and tips at hand preparing delicious cheesy garlic bread should now be easy task ahead enjoy every bite knowing made from scratch all home kitchen too!
Mistakes to Avoid
When making cheesy garlic bread, several common mistakes can detract from the final product. One of the main pitfalls is not using fresh ingredients. Fresh garlic and herbs make a significant difference in flavor. Using pre-packaged garlic or stale herbs can lead to a bland taste. Always opt for fresh ingredients whenever possible.
Another mistake is overloading on cheese. While cheesy garlic bread should be indulgent, too much cheese can result in a greasy texture that overshadows the garlic flavor. Aim for a balance; a good rule is about one cup of cheese per loaf for optimal taste and texture.
Not toasting the bread properly is another error. If you place your cheesy garlic bread directly in the oven without toasting it first, you may end up with soggy bread. To achieve that perfect crunch, pre-toast your bread lightly before adding the cheese mixture.
Additionally, some people forget to season their butter mixture adequately. Garlic alone can be strong, but adding herbs like parsley or oregano enhances the overall taste profile. A pinch of salt and pepper also goes a long way in elevating flavors.
Finally, neglecting to monitor cooking time can lead to burnt edges or undercooked centers. Keep an eye on your cheesy garlic bread as it bakes, removing it once it turns golden brown and bubbly for the best results.
Tips and Tricks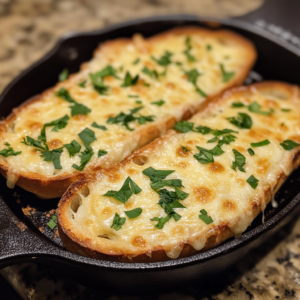
Creating perfectly cheesy garlic bread requires some useful tips and tricks that enhance both flavor and texture. Firstly, consider using a combination of cheeses for depth of flavor. Mixing mozzarella with parmesan or cheddar introduces different textures and tastes, making every bite delightful.
Another helpful tip involves using softened butter rather than melted butter for spreading on the bread. Softened butter allows for better distribution of the garlic mixture across the surface of the bread without soaking through, resulting in a crispier crust.
Experimenting with different types of bread can elevate your cheesy garlic bread experience. While traditional French baguette works well, sourdough or ciabatta can offer unique flavors and textures that are equally delicious when baked.
Don’t shy away from adding toppings! Chopped chives or red pepper flakes sprinkled on top add extra flavor and freshness. These toppings not only enhance visual appeal but also provide additional layers of taste that complement the cheesy goodness.
Lastly, let your cheesy garlic bread rest for a few minutes after baking before slicing into it. This short resting period allows flavors to meld together while ensuring that each piece holds its shape nicely when cut.
Suggestions for Cheesy Garlic Bread
To make your cheesy garlic bread even more enjoyable, consider these suggestions that enhance both presentation and taste. Pairing this dish with marinara sauce creates an excellent dipping option that adds moisture and tanginess to each bite. A side of homemade marinara elevates your dish from simple appetizer to gourmet delight.
Incorporating roasted vegetables into your cheesy garlic bread brings added nutrition and flavor diversity. Vegetables like bell peppers or spinach not only brighten up the dish but also provide essential nutrients while balancing out the richness of cheese.
For those looking to explore new flavor profiles, try adding sun-dried tomatoes or olives into your butter mixture before spreading it on the bread. These ingredients introduce robust flavors that complement garlic beautifully, making every bite an exciting experience.
If you’re preparing this dish for a gathering, consider making mini versions using slider buns or dinner rolls. These smaller portions allow guests to enjoy multiple bites without feeling overwhelmed by rich flavors.
Lastly, don’t forget about garnishing! A sprinkle of freshly chopped parsley or basil just before serving adds color and freshness while providing aromatic qualities that tantalize the senses.
FAQs
What type of bread is best for making cheesy garlic bread?
Choosing the right type of bread significantly impacts your cheesy garlic bread’s texture and flavor profile. Typically, French baguettes are favored due to their crisp crusts and chewy interiors which hold up well when baked with toppings. However, alternatives like sourdough or ciabatta work wonderfully too; they provide unique tastes that will surprise your palate! When selecting bread, ensure it’s sturdy enough to support generous amounts of butter and cheese without becoming too soggy during baking.
Can I make cheesy garlic bread ahead of time?
Yes! Preparing cheesy garlic bread ahead is absolutely possible and convenient! You can assemble everything—mixing together butter with minced garlic and cheese—and spread it onto your chosen loaf beforehand. Simply wrap it tightly in foil or plastic wrap and refrigerate until you’re ready to bake it later on. This method not only saves time but allows flavors to meld beautifully overnight! When ready to cook just remove from fridge 30 minutes prior so it bakes evenly at room temperature!
How do I store leftover cheesy garlic bread?
Storing any leftover cheesy garlic bread correctly ensures you retain its deliciousness! Allow any remaining pieces to cool completely before placing them in an airtight container or wrapping them tightly in aluminum foil; this prevents moisture loss while maintaining freshness! For optimal storage duration keep them refrigerated where they’ll last up to three days without losing quality; alternatively freeze wrapped portions up-to-three months if set aside! To reheat simply pop them back into an oven at 350°F (175°C) until warmed through!
Can I customize my cheesy garlic bread recipe?
Absolutely! Customizing your recipe allows endless creativity within this delectable dish! You can easily swap out cheeses based on personal preference—think gouda instead mozzarella—or incorporate various toppings such as caramelized onions or crispy bacon bits depending upon mood & occasion! Experimenting with spices like smoked paprika adds depth while drizzling balsamic glaze right before serving offers surprising zestiness too—it’s all about finding combinations that excite YOUR taste buds!
Conclusion
Cheesy garlic bread is a beloved classic that delights many palates around the world. However, creating this dish successfully requires attention to detail regarding both preparation techniques and ingredient selection.
By avoiding common mistakes like using stale ingredients or neglecting seasoning choices—your end result will undoubtedly impress family & friends alike! Implementing effective tips such as combining different cheeses & experimenting with various types of breads further enhances flavors while elevating overall presentation aesthetics too!
Additionally following our suggestions—like pairing sauces & adding toppings—opens avenues towards innovative pairings allowing individuals freedom exploring culinary creativity whilst enjoying each delicious bite wholeheartedly!
In summary: Focus on fresh ingredients along with balanced proportions; pay attention during baking times; feel free customize based upon preferences—these elements combined will guarantee satisfaction each time you whip up scrumptious batches right at home!